The key to fixing poor handwriting isn’t forcing a “correct” pencil grip; it’s addressing the underdeveloped foundational motor skills that make holding a pencil difficult in the first place.
- Handwriting is a whole-body task that relies on proximal stability (strong core and shoulders) before distal mobility (finger control).
- Targeted, play-based activities that build intrinsic hand strength are more effective than simply practicing writing.
Recommendation: Shift your focus from the symptom (the messy grip) to the root cause by implementing a posture-first, strength-building routine that prepares your child’s entire body for the fine motor demands of writing.
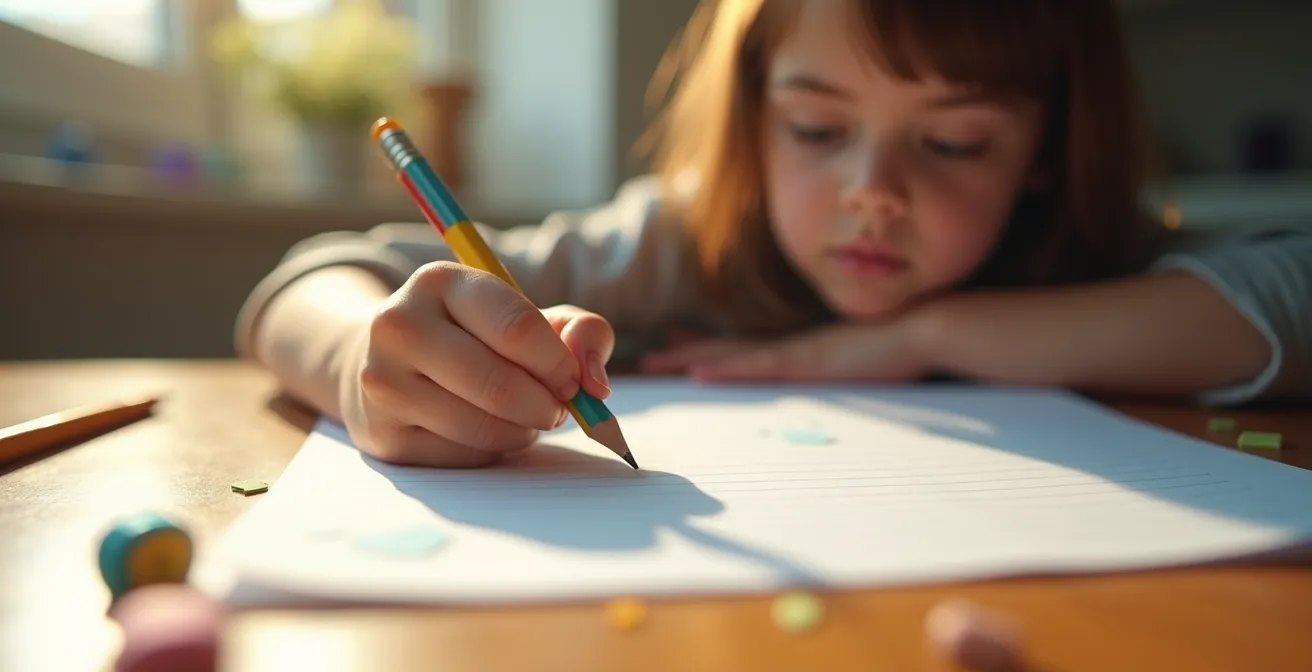
As a pediatric occupational therapist, I see many parents of third graders expressing the same concern: their child’s handwriting is messy, slow, and often painful. They’ve tried pencil grips, extra worksheets, and constant reminders to “hold it right,” yet the problem persists. The frustration is understandable, but it’s often aimed at the wrong target. The issue is rarely a lack of effort or a “bad habit.” More often than not, poor handwriting is a symptom of underdeveloped foundational motor skills that the modern world, filled with screens and swipes, no longer builds as effectively.
The common advice focuses on the fingers and the pencil, but this is like trying to decorate a house with unstable foundations. True, functional handwriting is a complex motor skill that begins not in the hand, but in the core and shoulders. This is the principle of proximal stability for distal mobility. Without a stable trunk and shoulder girdle, the small muscles of the hand (the intrinsic muscles) cannot perform the precise, coordinated movements required for legible and efficient writing. This is why a child may know what letters should look like but physically struggle to execute them without fatigue or pain.
This guide will reframe your approach. Instead of just treating the symptom—the pencil grip—we will address the root cause. We will explore the entire kinetic chain, from posture and gross motor strength to the specific fine motor skills that enable a functional, pain-free grip. You will learn why certain activities are more powerful than others and how to choose the right tools not as a magic fix, but as a strategic support. The goal is not a “perfect” grip, but a functional one that allows your child to express their thoughts on paper without physical struggle.
This article provides a structured, clinical approach to building the foundational skills necessary for effective handwriting. Follow along as we dissect the problem and build the solution, step-by-step.
Summary: A Clinical Guide to Improving Handwriting
- Swipe vs. Pinch: Why Tablets Are Weakening Toddler Hands?
- Tweezers and Beans: How to Build Hand Strength for Under $5?
- Thick or Thin: Which Pencil Helps a 4-Year-Old Write Better?
- The Writer’s Cramp: Exercises to Prevent Pain During Long Tests
- Scissors 101: The Step-by-Step Guide to Cutting a Circle?
- b vs. d Confusion: When Is Letter Reversal a Red Flag for Dyslexia?
- Velcro vs. Laces: Which Shoe Choice Avoids the Morning Bottleneck?
- Sight Words vs. Phonics: Why Guessing Based on Pictures Is Not Reading?
Swipe vs. Pinch: Why Tablets Are Weakening Toddler Hands?
The modern prevalence of tablets and smartphones has fundamentally altered the landscape of early childhood motor development. While these devices offer educational benefits, they primarily train a very limited set of hand movements: the swipe and the tap. These large, sweeping gestures utilize the bigger muscles of the forearm and shoulder but do little to develop the crucial intrinsic hand muscles. These are the small, intricate muscles located entirely within the hand that are responsible for precise, coordinated finger movements like those needed for buttoning a shirt, manipulating zippers, and, most importantly, controlling a pencil.
A pincer grasp, the movement used to pick up a small object between the thumb and forefinger, is the bedrock of a functional pencil grip. Activities like stacking blocks, threading beads, and manipulating play-doh are essential for strengthening these muscles. In contrast, a swiping motion is a gross motor movement that bypasses this critical stage of fine motor refinement. A child who spends significant time swiping may have strong arms but weak hands, a developmental imbalance that often becomes apparent when formal handwriting instruction begins.
The challenge is not that technology is inherently “bad,” but that it has displaced the very analog activities that build the muscular foundation for writing. A child struggling with pencil grip is often not being defiant; their hand may simply lack the strength and coordination to perform the task being asked of it. The development of fine motor skills requires exact coordination between hand muscles and the brain. The solution, therefore, is not to eliminate screens but to consciously counterbalance their effects with activities that specifically target the pinch, not the swipe.
By understanding this modern deficit, parents can become more intentional about integrating activities that build the specific muscles needed for academic success.
Tweezers and Beans: How to Build Hand Strength for Under $5?
Before a child can control a pencil, they must first develop foundational strength in their larger muscle groups. As counterintuitive as it may seem, a good pencil grip depends on strong shoulder and arm muscles. As research shows that gross motor development directly impacts fine motor control, activities like climbing on a playground, crawling, and throwing a ball are essential prerequisites to handwriting. These activities provide the proximal stability in the trunk and shoulders that allows for controlled movement in the hands and fingers.
Once that gross motor foundation is in place, you can focus on building intrinsic hand strength with simple, inexpensive, and highly effective activities. You do not need expensive therapy toys; a bag of dried beans, some play-doh, and a pair of child-safe tweezers can be a complete toolkit. The goal is to create “hand workouts” that are engaging and feel like play. These tasks encourage the separation of the two sides of the hand—the “power” side (ring and pinky fingers) and the “skill” side (thumb, index, and middle fingers).
Your Action Plan: The Fine Motor Skill Ladder
- Foundation Level: Start with squeezing whole sponges during water play and kneading play dough for at least 5 minutes to build overall hand strength.
- Intermediate Level: Progress to using clothespins to hang artwork or picking up cotton balls with tongs, which requires more isolated finger control.
- Advanced Level: Introduce activities like threading beads on a string or transferring dried beans from one bowl to another using tweezers to refine the pincer grasp.
- Expert Level: For a significant challenge, have your child sort rice grains by color or pick up single pieces of confetti with tweezers, demanding maximum precision.
- Maintenance: Implement a daily 10-minute rotation through different levels based on your child’s energy and focus to ensure continuous skill development.
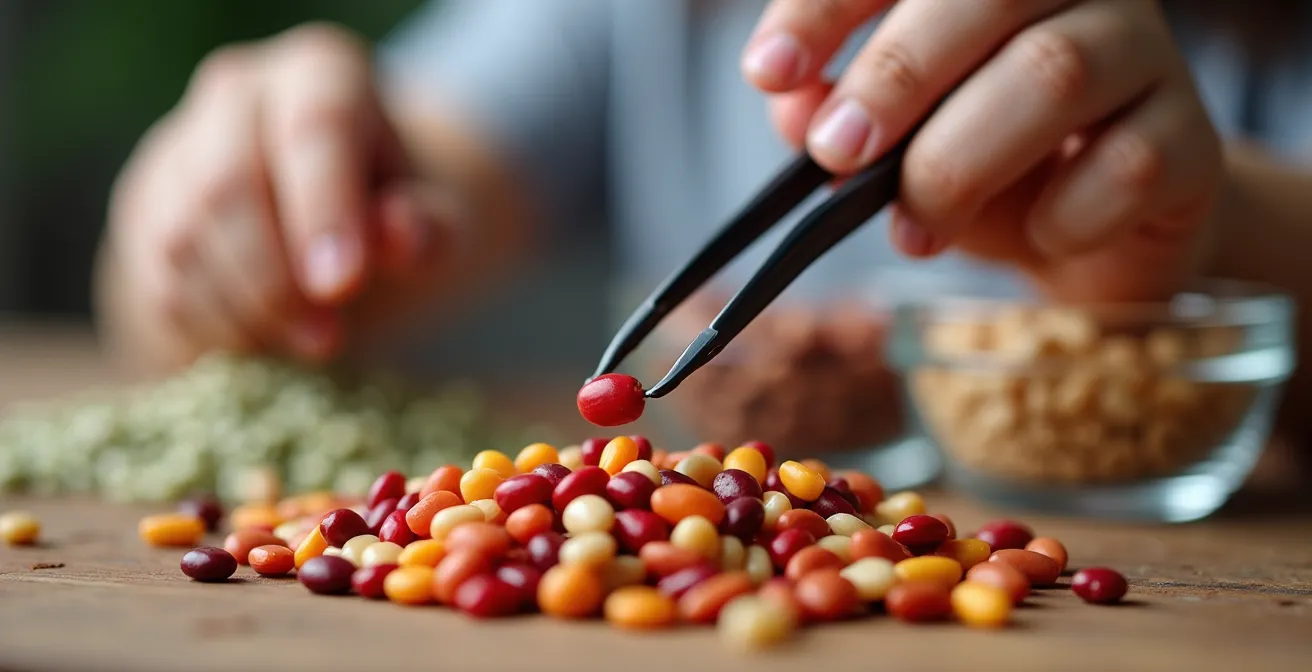
As seen in the activity above, using tweezers forces the child to adopt a tripod-like grasp, mimicking the ideal pencil grip and strengthening the exact muscles required. By gamifying the process—sorting by color, racing against a timer, or creating mosaics—you can turn a therapeutic exercise into a favorite pastime.
This structured play is far more effective than rote handwriting practice because it builds the underlying capacity for control, making the act of writing itself less of a physical chore.
Thick or Thin: Which Pencil Helps a 4-Year-Old Write Better?
The debate over pencil size is common among parents and educators, but the answer isn’t a simple one-size-fits-all. The choice of writing tool should be a prescriptive decision based on the child’s specific challenge, not a general rule. For a younger child, around age four, the focus shouldn’t even be on mastering a mature grip. As occupational therapist Heather Greutman states, this is not developmentally appropriate.
One thing that really stands out to me is that we should NOT be expecting preschoolers to hold a pencil like a 5-6-year-old should be mastering. This is not developmentally appropriate and we should be focusing on building the foundations through the fine motor, gross motor, and visual motor skills instead.
– Heather Greutman, COTA, Growing Hands-On Kids – Pencil Grasp Development Guide
With this developmental perspective in mind, the pencil or crayon becomes a tool to support emerging skills, not force a premature grip. For a third-grader, however, the choice can be more strategic. A common misconception is that larger, “jumbo” pencils are always better for small hands. While they can help a child with very weak grip strength by providing a larger surface area, they can also be cumbersome and promote a clunky, immature grasp in a child with adequate strength but poor positioning. Conversely, very short pencils (like golf pencils or broken crayons) are an excellent therapeutic tool. Their small size naturally forces the fingers into a tripod grip because there isn’t enough space to use a full-fisted or four-finger grasp.
The table below breaks down pencil and grip recommendations based on the specific difficulty your child is exhibiting. This allows you to move from guessing to making an informed, therapeutic choice.
| Child’s Challenge | Recommended Pencil Type | Why It Works |
|---|---|---|
| Weak grip strength | Thick triangular pencils | Larger surface area requires less pressure to hold |
| Poor finger positioning | Triangular or pencils with grips | Physical guides show where fingers should rest |
| Excessive pressure | Weighted pencils | Proprioceptive feedback reduces need to press hard |
| Wrapped thumb grip | Short golf pencils | Forces proper tripod grip due to limited surface |
| Fatigues quickly | Ergonomic cushioned grips | Reduces strain on finger joints |
Remember, a pencil grip or a special pencil is a compensatory tool, not a cure. It should be used in conjunction with the strength-building activities discussed previously to address the root cause of the difficulty.
The Writer’s Cramp: Exercises to Prevent Pain During Long Tests
Hand pain and fatigue during writing tasks, especially long tests, are significant red flags. It signals that the physical demands of the task exceed the child’s motor capacity. Most children who struggle with pencil grip complain of pain and have difficulty writing neatly. This pain is not just a hand problem; it’s a whole-body issue that often starts with poor posture. A “posture first” intervention focusing on core stability can have a dramatic impact. One study noted a 40% reduction in writing-related pain complaints during standardized tests simply by addressing posture before hand fatigue.
The ideal writing posture is the 90-90-90 rule: feet flat on the floor with a 90-degree angle at the ankles, knees, and hips, with the desk at a height that allows the forearms to rest comfortably. This stable base frees up the arms, wrists, and hands to focus on the fine motor task of writing instead of working to stabilize the body. When a child is slouched or their feet are dangling, their cognitive and physical resources are diverted to maintaining balance, leading to quicker fatigue and pain.

In addition to establishing a strong postural foundation, you can teach your child simple, quick micro-break exercises to perform during writing tasks. These movements release tension and reset the muscles, preventing the buildup of lactic acid that causes cramping. A two-minute routine can make a significant difference in endurance.
- Hand Shakes: Shake hands vigorously for 30 seconds as if shaking off water, then gently make and release a fist 5 times.
- Wrist Rolls: With arms extended, gently roll the wrists 10 times clockwise and 10 times counter-clockwise.
- Finger Stretches: Spread the fingers as wide as possible, hold for 5 seconds, then make a fist. Repeat 3-5 times.
- Shoulder Rolls: While maintaining good sitting posture, roll the shoulders backward 5 times to release neck and upper back tension.
Teaching a child to be aware of their body and to use these reset techniques empowers them to manage their own physical comfort, a critical skill for academic stamina.
Scissors 101: The Step-by-Step Guide to Cutting a Circle?
Scissor skills are often overlooked as a mere craft activity, but from a developmental standpoint, they are a powerhouse for building handwriting readiness. The act of cutting is a complex task that integrates several key components. Firstly, it builds intrinsic hand strength as the fingers continuously open and close against resistance. Secondly, it requires excellent motor planning to direct the scissors along a predetermined path. Most importantly, it is one of the best activities for developing bilateral coordination.
Bilateral coordination is the ability to use both hands together in a cooperative, differentiated manner. When cutting, one hand (the dominant hand) performs the skilled action of manipulating the scissors, while the other hand (the non-dominant hand) has the equally important job of holding and rotating the paper. This “worker” and “helper” hand dynamic is the same coordination required for writing, where one hand writes while the other stabilizes the paper. As occupational therapy research indicates that cutting with scissors is a prime method for teaching this cooperative hand use, even toddlers can start with safety scissors.
Like handwriting, scissor skills develop along a predictable progression. A child cannot be expected to cut a circle before they can make a simple snip. By guiding them through a sequence of increasing difficulty, you build their skills and confidence while avoiding frustration.
- Stage 1 – Snipping: Start by having them make single snips into the edge of paper or play-doh “snakes”.
- Stage 2 – Straight Lines: Progress to cutting along thick, short (4-6 inch) straight lines.
- Stage 3 – Angles: Introduce zig-zag patterns with clear corner turning points.
- Stage 4 – Curves: Begin with gentle wavy lines, then move to tighter curves.
- Stage 5 – Shapes: Start with squares, which require stopping and turning at corners.
- Stage 6 – Circles: Finally, tackle circles. Begin with large 6-inch circles and gradually reduce the size as skill improves. This is the most advanced stage as it requires the helper hand to be in constant, fluid rotation.
By treating scissor practice as a key part of your handwriting improvement plan, you are targeting multiple foundational skills in one engaging activity.
b vs. d Confusion: When Is Letter Reversal a Red Flag for Dyslexia?
Letter reversals, particularly the confusion between ‘b’ and ‘d’, are a very common source of parental anxiety. It is crucial to understand that in young children (up to age 7), these reversals are a normal part of visual-spatial development. The letters ‘b’ and ‘d’ are mirror images, and a young brain is still learning to recognize that orientation matters for symbols like letters, whereas it doesn’t for objects (a chair is a chair no matter which way it faces). Most children naturally outgrow this by the end of second grade as their visual processing and directionality skills mature.
A red flag for a potential underlying issue like dyslexia is not the mere presence of reversals, but their frequency, persistence, and co-occurrence with other symptoms after age 7 or 8. If a third-grader is still reversing letters frequently, and this is combined with other difficulties—such as trouble with rhyming, slow and effortful reading, difficulty remembering sequences like the days of the week, or a family history of reading struggles—then a professional evaluation may be warranted. It’s the pattern of difficulties, not just the isolated symptom, that provides a clue.
Constant verbal correction (“That’s a ‘b’, not a ‘d’!”) is often ineffective and can increase a child’s anxiety around writing. A much better approach is to use multi-sensory techniques that build a stronger physical and kinesthetic understanding of the letter’s form. These methods engage muscle memory and different sensory pathways to solidify the concept of directionality.
- The ‘Bed’ Trick: Have the child make two fists and touch their knuckles together. Their left hand forms the ‘b’, their right hand forms the ‘d’, and together they spell the word ‘bed’. This is a quick physical cue they can use anytime.
- Sand or Salt Tray Writing: Practice tracing the letters with a finger in a shallow tray of sand or salt. The tactile feedback reinforces the motor plan for each letter.
- Clay Letters: Roll play dough into “snakes” and have the child form them into ‘b’ and ‘d’. This 3D manipulation helps them internalize the letter’s components (the line and the circle) and their orientation.
- Air Writing: Use large arm movements to “write” the letters in the air, emphasizing the starting point and direction (“start with the bat, then the ball” for ‘b’).
By using these multi-sensory strategies, you are not just correcting a mistake; you are actively teaching the brain and body the correct motor pattern in a supportive, low-stress way.
Velcro vs. Laces: Which Shoe Choice Avoids the Morning Bottleneck?
The daily struggle over shoelaces is more than just a morning inconvenience; it’s a window into a child’s fine motor development. Shoe tying is one of the most complex daily living skills a child learns, requiring a high degree of bilateral coordination, finger dexterity, motor planning, and hand strength. For a child already struggling with the fine motor demands of handwriting, mastering shoelaces can feel like an insurmountable task, leading to frustration for both parent and child. In this context, the choice between Velcro and laces becomes a strategic one.
For school mornings, when time is short and stress is high, Velcro is the clear winner. It promotes independence, reduces conflict, and gets you out the door on time. Insisting on laces on a hectic Tuesday morning sets a child up for failure and can negatively impact their mindset for the school day. However, this doesn’t mean you should abandon laces altogether. A highly effective approach is the “Velcro Weekdays, Laces Weekends” strategy. This hybrid model removes the time pressure, allowing the child to practice shoe-tying on a relaxed Saturday morning when they are fresh and you have the patience to teach.
To teach shoe-tying effectively, you must break the task down into its component micro-skills. Don’t just show them the whole process at once. Master each step individually before combining them.
- Micro-skill 1: Creating the ‘X’. This develops the initial bilateral coordination of crossing the laces.
- Micro-skill 2: The First Knot. Tucking one lace under builds finger strength and precision.
- Micro-skill 3: Making “Bunny Ears”. This practices maintaining a pincer grip on one loop while manipulating the other.
- Micro-skill 4: The Wrap Around. The most complex step, integrating all skills simultaneously.
- Micro-skill 5: The Pull Through. This final step requires controlled force and dexterity.
This methodical, low-stress approach not only teaches a child to tie their shoes but also reinforces the same fine motor skills and sequencing abilities needed to form letters on a page.
Key Takeaways
- Handwriting is a whole-body skill; proximal stability in the core and shoulders must be established before fine motor control in the fingers can be effective.
- Targeted, play-based activities (e.g., using tweezers, play-doh, scissors) are more effective for building hand strength than rote handwriting practice.
- The right tool (e.g., a specific pencil type) should be chosen prescriptively to support a specific weakness, not as a one-size-fits-all solution.
Sight Words vs. Phonics: Why Guessing Based on Pictures Is Not Reading?
In the complex world of learning to read, a frequent issue arises when children become over-reliant on guessing strategies, particularly using pictures to decode words. While picture cues can be a helpful scaffold for early comprehension, they do not constitute reading. True reading involves orthographic mapping—the process of connecting the letters and letter patterns in a word (graphemes) to the sounds they represent (phonemes). Guessing based on a picture bypasses this critical process, creating a fragile foundation for literacy. A child might correctly “read” the word ‘dog’ next to a picture of a dog, but they haven’t actually decoded the word itself.
This is where the physical act of writing becomes a powerful tool for reinforcing literacy. The kinesthetic link between reading and writing is often overlooked. As OTR Colleen Beck notes, this connection is critical.
The kinesthetic link between reading and writing is often overlooked. When children physically write letters as they sound them out, it creates a powerful hand-brain connection that reinforces both phonics and sight word recognition simultaneously.
– Colleen Beck, OTR/L, The OT Toolbox – Integrating Fine Motor Skills with Literacy
When a child physically forms the letters of a word, they are engaging multiple sensory systems. They see the letter shape, they feel the motor movement required to form it, and they can say the corresponding sound aloud. This multi-sensory input creates a much stronger and more durable memory trace in the brain than simply looking at a flashcard. To leverage this connection, you can integrate hands-on writing activities into sight word practice.
- Build words with magnetic letters on a cookie sheet to reinforce letter sequence through physical manipulation.
- Trace sight words in a salt tray or with finger paint to combine sensory input with motor memory.
- Stamp words with ink letter stamps, which practices controlled pressure and positioning while building the word.
- Form words with wiki sticks or play-doh to build a 3D understanding of letter shapes.
By transforming sight word practice from a passive visual task to an active, kinesthetic one, you are not only improving your child’s hand skills but also cementing their reading abilities on a much deeper neurological level.
Frequently asked questions on Pencil Grip Struggles
At what age should letter reversals stop being normal?
Most children stop reversing letters by age 7. Occasional reversals up to age 8 can be typical, but frequent reversals after age 7, especially with other signs, warrant evaluation.
What co-occurring signs might indicate dyslexia rather than normal development?
Look for: difficulty with rhyming, trouble remembering sequences (days of week, alphabet), slow naming speed, family history of reading difficulties, and avoiding reading/writing activities.
Should I correct every b/d reversal my child makes?
No. Focus on multi-sensory teaching methods instead. Have them trace letters in sand, form letters with clay, or use the ‘bed’ hand trick rather than constant correction which can increase anxiety.